While I was waiting for the cleaning crew to finish up in my classroom last week, I did some planning. I took pictures of each wall after the room was cleared out. I then printed the pictures on computer paper, and used them to plan my bulletin boards and wall space.
My room was all ready to go last Wednesday already! I spent about 2 hours last week, and 6 hours today at school. The first thing I did was put all of the furniture back exactly how I wanted it. This is where my craziness comes out a bit. You know how it's really annoying when your students' desks or tables shift during the school day? During the summer, right when the cleaning crew is finished in my classroom, I like to put my tables exactly where I want them during the school year. That way they have 2+ months to make a little dent in the carpet. During the school year, they barely shift, and when they do, they always fall right back into their little dents.
Next, I began putting some things out on the shelves, such as my classroom library bins. Due to the fact that I don't have any "working corners" (every corner is taken up by either built-in cabinets, counters, or the door), I had to place all of my classroom library book cases along one wall. I love seeing cute, cozy library corners, so this is a bit of a bummer. :( Here is a peak at my classroom library so far (I am going to re-do the labels this summer):
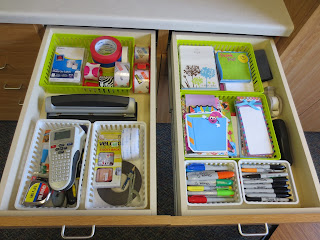
My big project today was organizing my teacher desk materials. As mentioned in a previous post, I decided to get rid of my teacher desk. I decided to make a teacher toolbox for my office supplies. (If you don't know what I'm talking about, search "teacher toolbox" on Pinterest.) I still have to cover the drawers in scrapbook paper and add labels, but this is what it looks like so far:
I also needed something to hold papers that need to be filed, and books/resources that I use frequently. I found the PERFECT solution in a closet of old, unused materials (it needs a good coat of spray paint):
Next, I organized the rest of my desk items that would not fit in the teacher toolbox:
Here is my finished "teacher desk" area:
I am LOVING my room without a desk so far! It freed up so much space, and it really forced me to get organized. I never realized how much "junk" was shoved in my desk drawers.
Here is what my room looked like at the end of the day today:
(Note: It drives me crazy that the SMART board is not centered in the middle of the room!)
Time spent working on room last week & today: 8 hours
Cumulative hours: 28.5


Lovin' your room! It looks fantastic!
ReplyDeleteWhere did you find the aqua pocket charts?
Thanks!
DeleteI purchased the pocket charts at Target in the dollar spot about 7 years ago. I know that Target usually sells them each year, starting sometime in July. Unfortunately, they have become smaller and lower-quality over the years. :(
I am in love with your room!
ReplyDeleteHi!
ReplyDeleteI also hate the shifting of the desks! I zip tie mine together, that way if one kid wants to move, all six have to move. I don't have ANY desks move - all year! I love your small bookshelves at the end of each group of desks. I do the same thing. Looks great
Holy cow! You're quite the organizer! :) Maybe I should hire you to come and do my classroom. You can start an Interior Decorating business for teachers! ;)
ReplyDeleteI, too, am moving into a new room (my old room was a portable - yuck!) so I'm excited about re-doing my walls, etc. :)
I'll keep your blog bookmarked. Thanks for the ideas!
The way you explain is very easy to understand. You can also check our blog : desktop item for gifting
ReplyDelete