Wednesday, July 31, 2013

Inside My Cupboards


I spent the entire day cleaning and organizing my binders and resource books. I decided that I need to stop shopping on Amazing late at night.

All of my teaching materials are stored in binders. I like how binders allow me to see everything as I browse my resources. Files are just too messy for me, even when they're organized. (Read more about my file organization here.) I only use file drawers to store copies and information that I refer to frequently.

So here is my wonderful wall of storage!


Here is a peak inside the top cupboards. This one contains 2nd semester textbooks, and my socials studies and science resources (most of them are stored in a separate cupboard that is shared by the 2nd grade team).


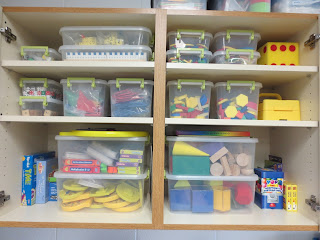
Here are my math manipulatives:


Here are my math resources, and our reading curriculum, Storytown (which I don't really use). I LOVE how nicely the Ikea magazine holders work for categorizing my resource books.


ELA resources: I used to care about color-coding my binder spines, and making them look really nice, but that is one thing that I have let go of!


ELA manipulatives: It looks a little crazy here, but many of these things will be used right away at the beginning of the year, such as word work materials. I don't put them out ahead of time, because I want to get to know my students first. I have a lot of different materials, and different classes have different needs/interests from year to year.


The top shelf of this cupboard contains some guided reading materials, and books that I don't keep in the classroom library (most of them have flaps, or weird things that fold out and would get ruined easily). The next 2 shelves contain my guided reading materials, which I like to keep "hidden" for 2 reasons: 1) I have the space in my cupboards, and 2) It makes my room look less cluttered. Thankfully, my school has a great reading resource room full of books, so I don't have to store very many guided reading books in my classroom.

The bottom 2 shelves contain file folder games for small group learning, and extra school supplies.


This is where I store "household items," such as tissues, sandwich baggies, plates, etc. This cupboard will be FULL after open house!


I also have some great build-in drawers! Here are my extra accents, postcards, nametags, etc. (can you tell I've worked at a teacher store for 3 years?):


These drawers contain supplies for students:


The last few drawers contain my office supplies:


I have 5 really large drawers that are perfect for storing bulletin board sets. Here is the top drawer, which looks a bit messy! It contains pocket charts, sentence strips, and birthday stuff (they get to pick out a book for their birthday). Organized chaos:


My bottom cabinets have these great pull-out drawers (3 sets total...I won't show all of them). Here are the recess games:


Wow, that was a lot of pictures! Some people will probably thinking I'm weird for posting pictures of the inside of my cupboards, but I know that the crazy organization people, like myself, will enjoy them. :)

Time spent at school today: 8 hours
Cumulative hours: 118.5

Monday, July 29, 2013

Making Your Room Feel Larger


My room is not huge, ginormous, or gigantic. However, those are some of the adjectives people have used to describe my room after seeing pictures online. When former students visit my classroom, they often comment on how much larger it is than their classroom. They are surprised when I tell them that the rooms are the exact same size.

When I first started in my district, I was actually surprised at how small the classrooms were. My room is about 27' X 28'. I'm sure some teachers would consider that large, but it is pretty small compared to other districts I have visited.

I think my room may look large for a few reason:
1) I only keep things in my classroom that I know I am going to use. Every piece of furniture has a purpose. When I move into a new classroom, I usually get rid of about 1/4 of the furniture.
2) I have tables instead of desks. Tables take up way less space, and promote cooperative learning. My tables were funded through a Donor's Choose project last spring.
3) I try to keep my wall decor to a minimum, and everything is color-coordinated. I feel like this makes my classroom look less "busy."
4) I am a thrower. I hate "stuff." So many teachers hoard materials and furniture, thinking they may use it someday. I give away almost everything that I'm not using right now.

Left view of my classroom (it's almost done!):


Right view:


I thought my Daily 5 charts needed something more, so I made this pennant banner today:


I bought this listening center from a retiring teacher (her husband made it from an old table). My fiance put the Ikea spice rack up for me yesterday. (He also helped me with some other "handyman work.") It will hold the book choices and CD's for the week.


I found this banner on clearance last week for $2, and I thought it would be perfect above my social studies and science board.


My room is so close to being finished! :)

Time spent at school yesterday and today: 8 hours
Cumulative Hours: 110.5

Thursday, July 25, 2013

Bulletin Boards Complete!


I finished my bulletin boards today! I try to keep my walls pretty empty until students arrive, so that we can make our anchor charts together. I also don't create very many student management boards. For example, some teachers have library check-out systems, math workshop boards, behavior management boards, Daily 5 choice boards, etc. I'm huge proponent of student choice, and keeping things as simple as possible. My classroom seems to run more smoothly when my students have choice, and are more responsible for their own learning.

Here is the wall above my classroom library:


This is my PBIS board (our school colors are purple and yellow). The charts to the right, and the big purple paw are documents that were made by my school to display student expectations. Our "point menu" will be on the bottom left of the board. Instead of student of the week or star student, we have a "Top Dog." The Top Dog's all about me poster will be displayed underneath the dog bones.


Here is a close-up of my classroom jobs. I don't create classroom jobs just for the sake of having jobs. They all exist to make my life easier! :) I simply rotate jobs by moving the dogs from pocket to pocket each week.


This board is going to be used for various ELA anchor charts.


Here is close-up of my word collector. It is actually a plain white large calendar chart that I trimmed down. I then added bulletin board trimmer to the outside.


Here are my genre charts. I put them up with just one push pin, so that I can take them down when teaching the genres. I purchased them from Amanda Nickerson's store on Teachers Pay Teachers (One Extra Degree). My students loved these posters last year, and referred to them quite often.


Here is my calendar board, which I actually re-did twice! I was going to use a calendar chart with velcro, but I just couldn't part with my pocket chart. It's just so easy to move the cards from pocket to pocket each month. I'm really excited about the Fascinating Facts pad that I just purchased from Really Good Stuff!


This my writing board, which will contain both writing anchor charts, and choices for Work on Writing. I originally wanted to use pennants for the board title, but they took up way too much room and looked too "girly cute," so I cut them down to circles.


Finally, this is my social studies and science board, which will contain anchor charts and vocabulary for the units we are studying.


Here is a close-up of the letters. I purchase the black letters from Frog Street Press, and taped them to scrapbook paper.


Time spent at school this week: 11.5 hours
Cumulative Hours: 102.5

Friday, July 19, 2013

Bulletin Boards (Finally!)


After buying bulletin board fabric yesterday, I was very eager to start putting it up, even though all of my trimmer hasn't come in yet. In the past, I used different colored fabric on my bulletin boards. Then I saw pictures online of a classroom with all black bulletin boards, and I fell in love with the idea. The black background is simple, and really makes the things on the bulletin board "pop." The inspiration for my borders came from Schoolgirl Style's bird theme. I love the way Melanie layered the corrugated border with Teacher Created Resource's mini polka-dot border. The boards without border are going to be lime green.


The white calendar in the middle of this board is actually going to be my word collector. I am going to add a thin layer of trimmer to the outside. It is covering up a hole I cut in the fabric on accident.


My order from Really Good Stuff arrived today while I was at school! I ordered this book display, which I plan on using for author study books. I love it!


I am very excited about these Daily 5 templates  (FREE on TPT!). They were made to be printed on legal-sized paper, but I had them blown up at a local print shop. I love that they provide a (cute) template/design for making the anchor charts. My only complaint is that they don't contain the "I" that is so important to the Daily 5 structure. (I plan on drawing a line along the bottom to make an I.)


Finally, I labeled my cupboards. I use a label-maker for the cupboards that contain my teaching materials. I then use a different label for cupboards and drawers that contain student materials:


What a long day!!! TGIF

Time spent working on room today: 6.5 hours (It felt more like 10. :)
Cumulative hours: 91

Thursday, July 18, 2013

CAFE Menu


My CAFE menu plan has changed 5 times in the past 2 weeks! Now I wish I would have taken pictures along the way...I just could not decide on how I wanted it to look. I ran into a few problems in my planning:
1) The menu is on a chalkboard, which I thought was identical in size to the chalkboard in my old classroom. However, it is about 8 inches shorter in height. My menu cards were barely fitting last year, and now I have less space. So, I decided to put the headers above the chalkboard.
2) I had just ordered some pretty new car door magnets from Vista Print to use as my headers. :( Obviously, my wall is not magnetic, so they would not work with my new arrangement. Thus began my search for new menu headers. I ended up using the editable labels that I purchased from Kristen Doyle.

I think I'm finally happy with the results. Who knows, maybe it will change again next week. :) I went to school early today to finish it off:


Since there are so many more comprehension strategies than any other category, I decided to make 2 rows for the cards on my menu. This is my over-flowing menu from last year:


A side note about CAFE: there are some super-cute CAFE menu bundles floating around on the internet that include headers and cards. I highly suggest you allow the children to write out the menu cards. The Sisters themselves have said that numerous companies have approached them about making CAFE and Daily 5 products, but they will never accept any of the offers, because it is so important for kids to take the ownership for their own learning. Their cards may not look as pretty as the ones that can be purchased online, but they LOVE being "experts" on strategies, and they take pride in writing out that menu card!

I am off to Joann Fabrics to buy fabric for my bulletin boards, and to St. Vincent De Paul's for some book shopping! One last tip I wanted to share: I keep a sample of my classroom trimmers and other patterns in a baggie in my purse, so that when I'm out shopping I don't have to wonder if something is going to match. It has been very helpful!


Time spent working on room yesterday and today: 4 hours
Cumulative hours: 80.5

Tuesday, July 16, 2013

Odds and Ends


Today I worked on a bunch of little things. I painted the random blue paint spots in my room, worked on my CAFE menu, and labeled my cabinets. I also adjusted some tables. This is going to be my writing board. It will contain anchor charts, and writing choices for Daily 5.


I decided to remove the legs on this table altogether. I didn't want the mailboxes to cover up too much of the bulletin board.


I'm getting anxious to put my bulletin boards up! I ordered most of the materials last week, so they should be arriving soon.

Time spent working on room today: 3.5 hours
Cumulative hours: 76.5

Sunday, July 14, 2013

DIY Alphabet Line


I wanted a new cursive alphabet line for this school year. Most cursive alphabet lines are in "traditional" font, but my school teaches modern cursive. Many of the letters are the same, but there are enough differences between the two to confuse my 2nd-graders as they are learning cursive for the first time. While shopping online, my choices for a modern cursive alphabet line were very limited. And, of course, there weren't any print alphabet lines that matched.

I ended up purchasing this sock monkey alphabet line from Trend:


I trimmed it up a bit, and combined it with a modern cursive alphabet line, also from Trend:


Pretty ugly, right?! I finished by covering the designs up with trimmer from Frog Street Press, which I cut in half to fit perfectly into place (ignore the ugly blue paint spot!):


I also made new schedule cards, which hang in pocket charts underneath my smartboard (made from editable labels by Kristen Doyle):


Then I finished another job I had been dreading: putting up my clock numbers. If my clock wasn't next to a speaker system, this job would have been much easier! (I can't remember where the numbers came from, sorry!)


Lastly, I made headers for my math wall. Each chart is going to contain vocabulary, pictures, anchor charts, etc. related to the different areas of math that we study.


I felt like I LIVED at school this week! I'm such a perfectionist when it comes to making stuff like this. I tend to play with the font type and size, and everything has to be just to my liking before I can move on. I drive myself a bit crazy. :)

Time spent working on room Thursday, Friday, and Sunday: 14 hours
Cumulative hours: 73